Over the past few years, AI has evolved so much in every field that it has left everyone surprised and curious about what more it can do.
If we talk specifically about AI in content, every task is being automated, from generating content ideas and writing articles to creating images, videos, SEO metadata, and more. Not only that, its capabilities are now being extended further with MCP (Model Context Protocol), allowing AI to interact with external tools and applications to perform actions on your behalf.
Imagine this, instead of asking AI to generate an article, copying that content, opening WordPress, and pasting everything manually, you simply tell the AI:
Write a blog post about AI in WordPress and save it as a draft on my website.
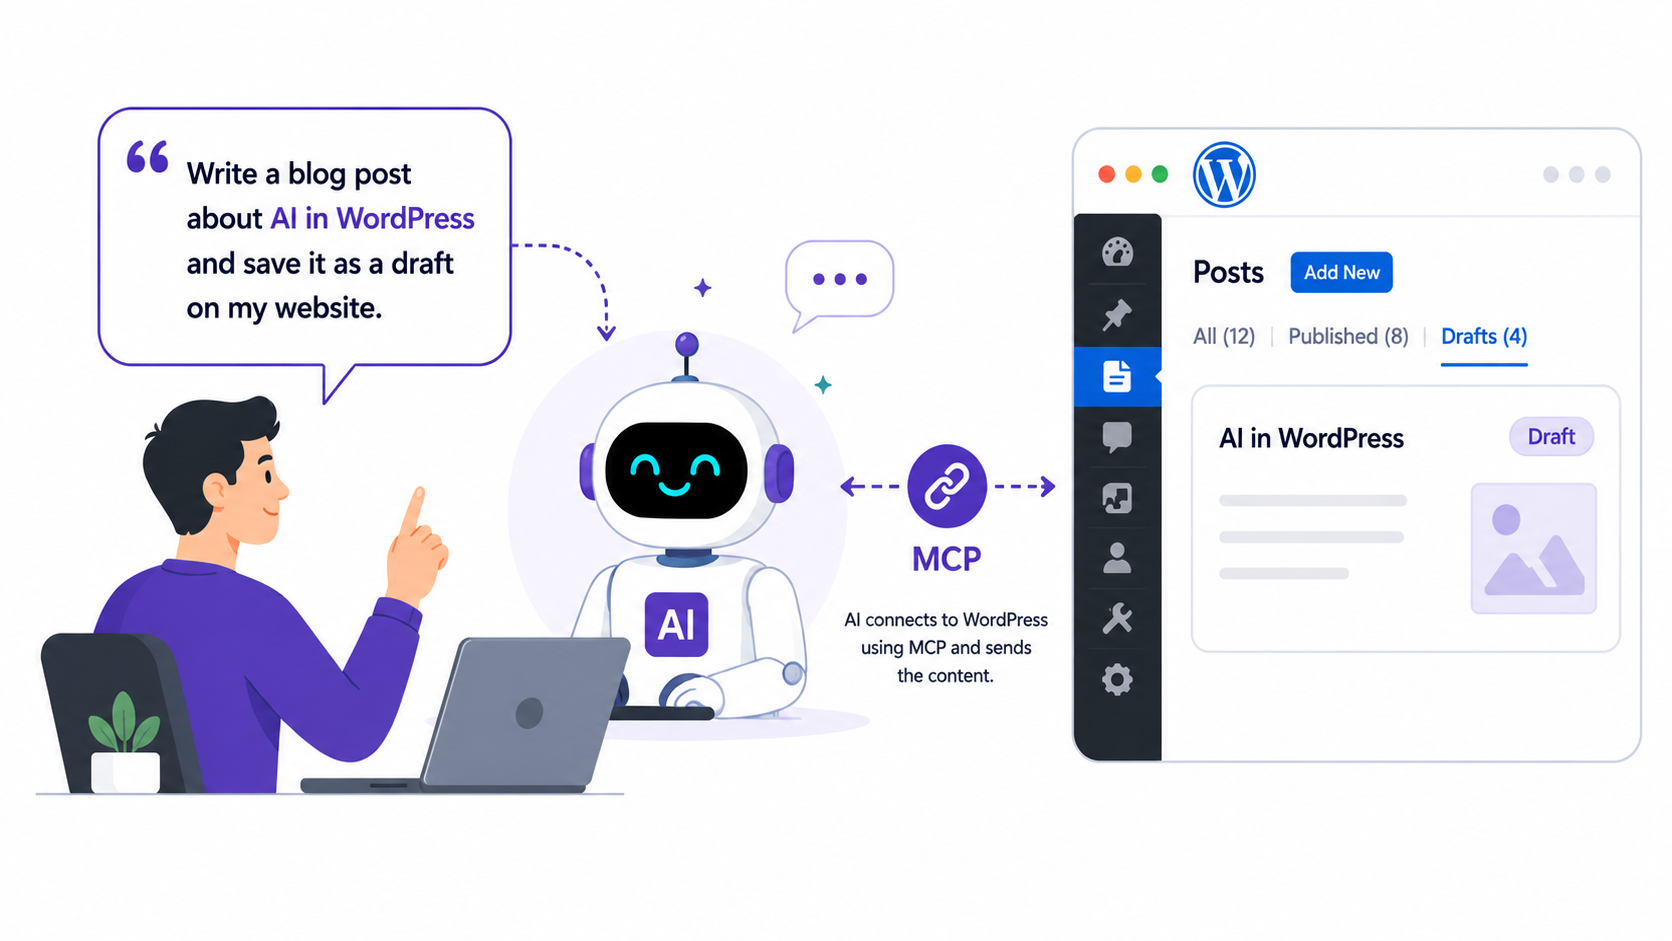
All you have to do is review the content, suggest changes to the AI, and just ask it directly to publish your blog.
In this guide, we will go through the complete process step by step and see how, using MCP server, an AI agent can directly create and publish a blog post in WordPress.
But before setting up the connection, it is important to understand two basic concepts: MCP and WordPress Abilities.
What is MCP and WordPress Abilities?
- MCP: MCP (Model Context Protocol) is an open protocol that allows AI agents to connect and communicate with external applications such as WordPress.
- Abilities: An Ability describes something that WordPress can do and make available to another system. For example, an Ability can allow AI to read your WordPress site information, create a draft, edit content, or publish a post.
WordPress MCP and WordPress Abilities have different jobs, but they work together.
MCP creates the connection between the AI agent and WordPress. Once that connection is available, the AI can check which WordPress Abilities are available and use the required Ability for a particular task.
However, there is one limitation. By default, WordPress only supports the following core abilities:
core/get-site-infocore/get-user-infocore/get-environment-info
These default Core Abilities are read-only. They can return information only and cannot make changes to your website.
So, if you ask AI to create or publish a new WordPress blog post, there are no default core abilities that can perform these actions.
To perform those tasks, WordPress needs additional abilities. This is where custom WordPress Abilities solve the problem.
Add Custom WordPress Abilities
Custom Abilities extend what an AI agent can do on your WordPress site.
For example, if you want the AI to perform actions such as creating a blog draft, editing a post, or publishing content, you need to add custom Abilities for those actions.
For this tutorial, we created a small custom plugin that adds two Abilities:
- Create Blog Draft: Allows the AI to send a title and content to WordPress and save it as a draft.
- Publish Blog Post: Allows the AI to publish an existing draft.
Once you activate this custom abilities plugin, the above-mentioned abilities will then be added to WordPress and will be made available through the MCP for the connected AI agent to discover and use them when needed.
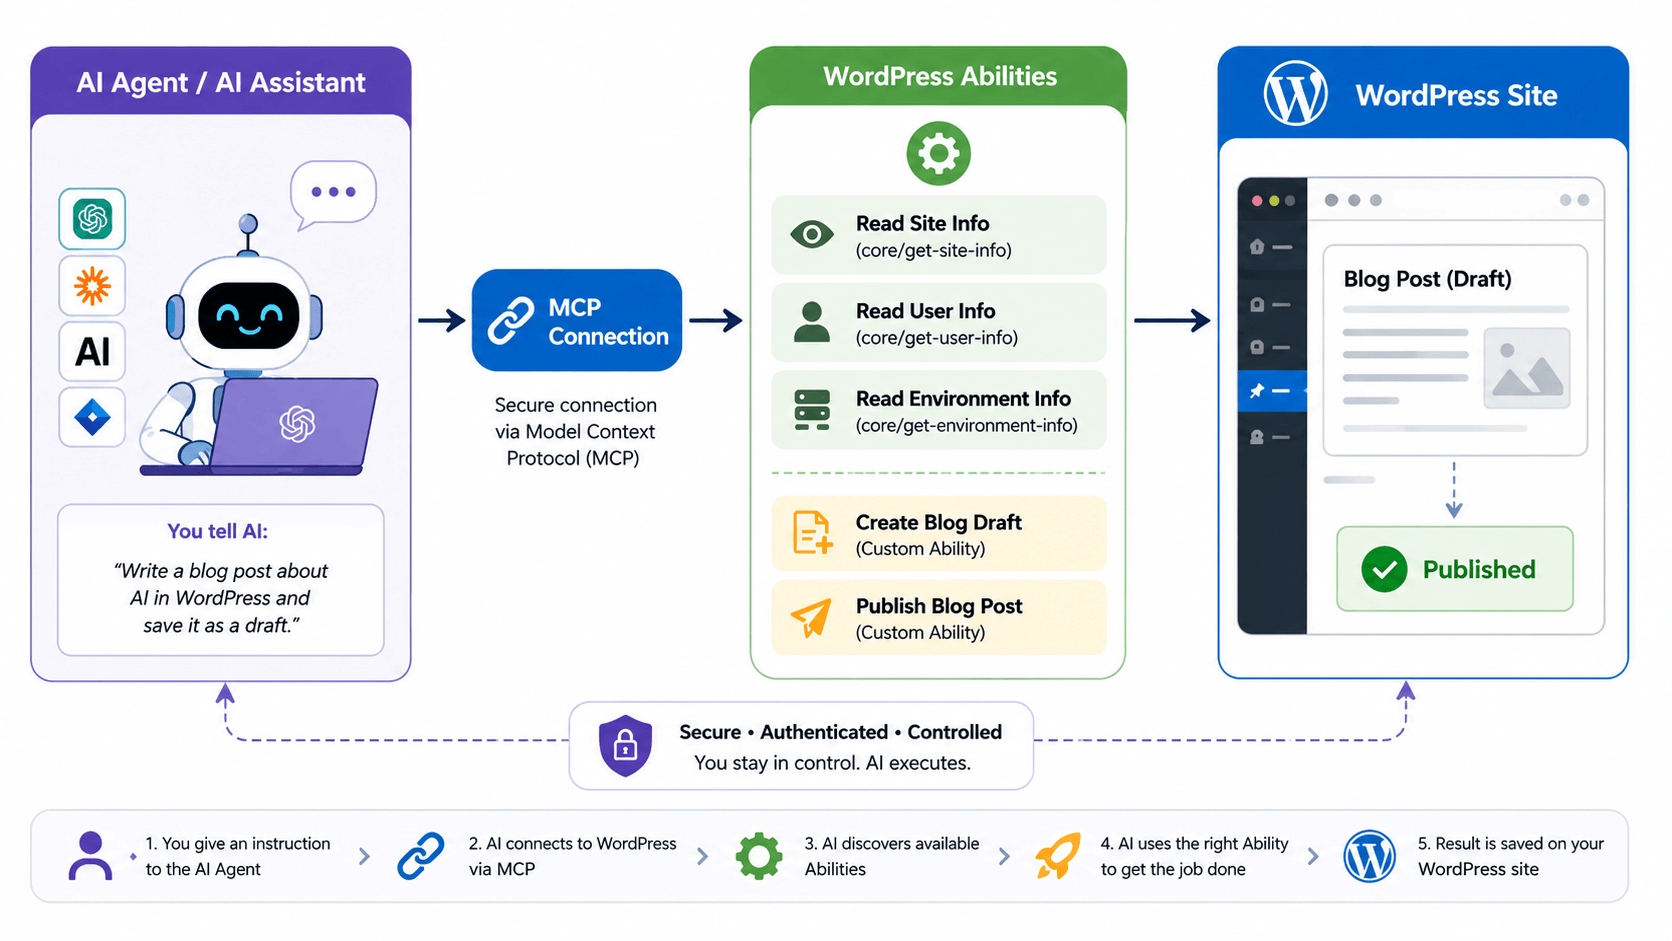
Now that the basic concept is clear, let’s follow the steps step-by-step to publish a blog post directly on WordPress using AI through the MCP server.
How to Set Up AI-Powered WordPress Publishing With MCP
Step 1: Install the Required WordPress Plugins
- First, make sure you have installed and activated the WordPress MCP Adapter plugin.
The MCP Adapter will act as the WordPress MCP server and will make your WordPress Abilities available to compatible AI applications.
At this point, the connection is available, but as discussed earlier, the connection alone does not give AI the ability to create or publish posts.
- Next, install and activate the custom WordPress Abilities plugin.
After activating both plugins, WordPress now has:
- The MCP connection through the MCP Adapter.
- The actions required to create and publish blog posts through the Custom Abilities plugin.
Step 2: Create a WordPress Application Password
Next, WordPress needs to know which user is making the requests; for that, we need to create an Application Password.
- From your WordPress Dashboard, navigate to Users > Profile.
- Scroll down to the Application Passwords section.
- Enter a name for the connection.
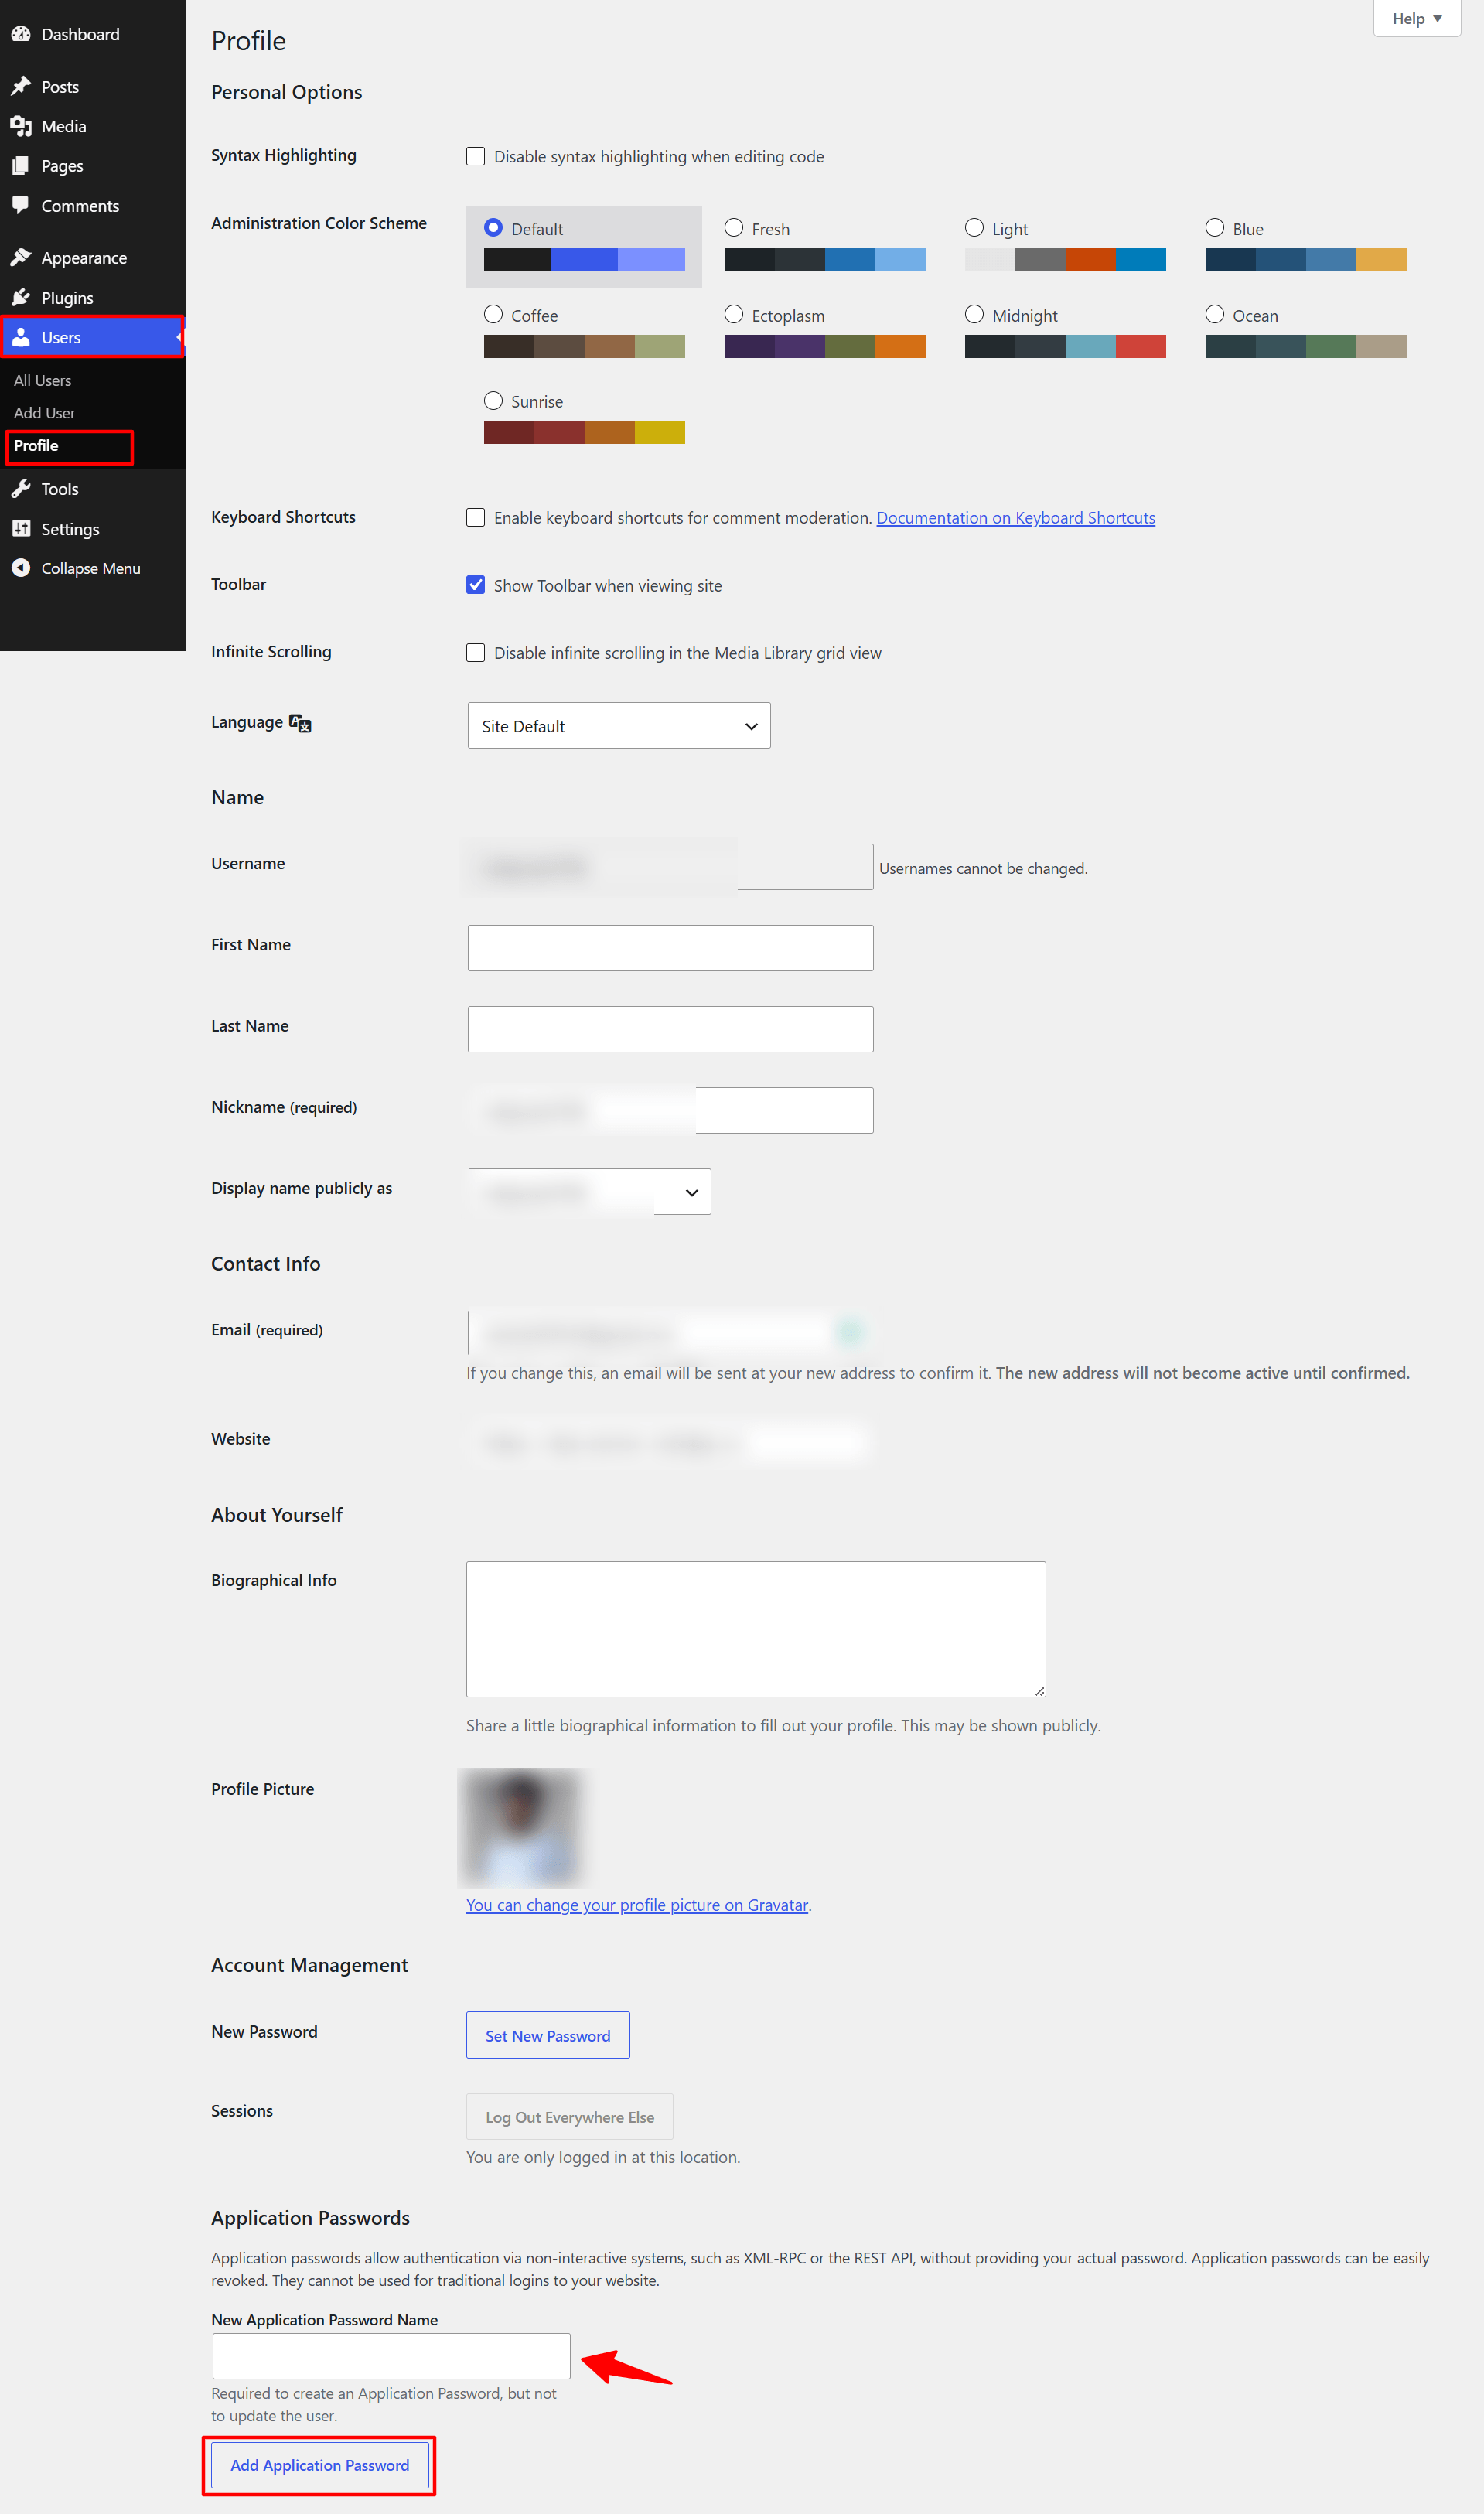
- Next, click Add New Application Password.
- Copy the password generated by WordPress and keep it secure.

Step 3: Install Node.js
There is one more thing we need because the AI agent and your WordPress website are running in different places.
VS Code, Claude, or Cursor runs on your computer, while your WordPress website runs on a web server. So, we need a small remote connector that carries MCP requests between them. This connector runs using Node.js.
(For this guide, we are going to use VS Code.)
- After installing Node.js, open Command Prompt on Windows and run: node -v, then run: npx -v
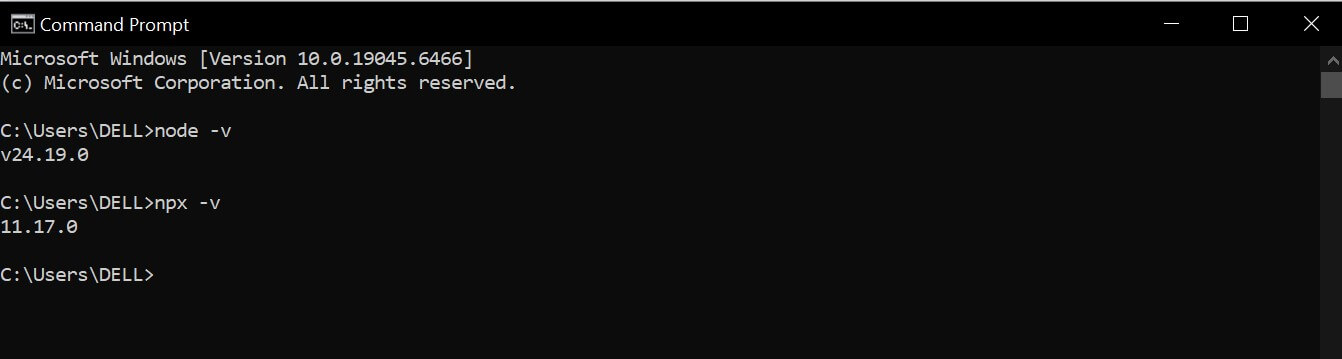
If both commands return version numbers, Node.js is ready.
Step 4: Connect VS Code to WordPress
Now the next step is to tell VS Code where your WordPress MCP server is located.
- Open Visual Studio Code.
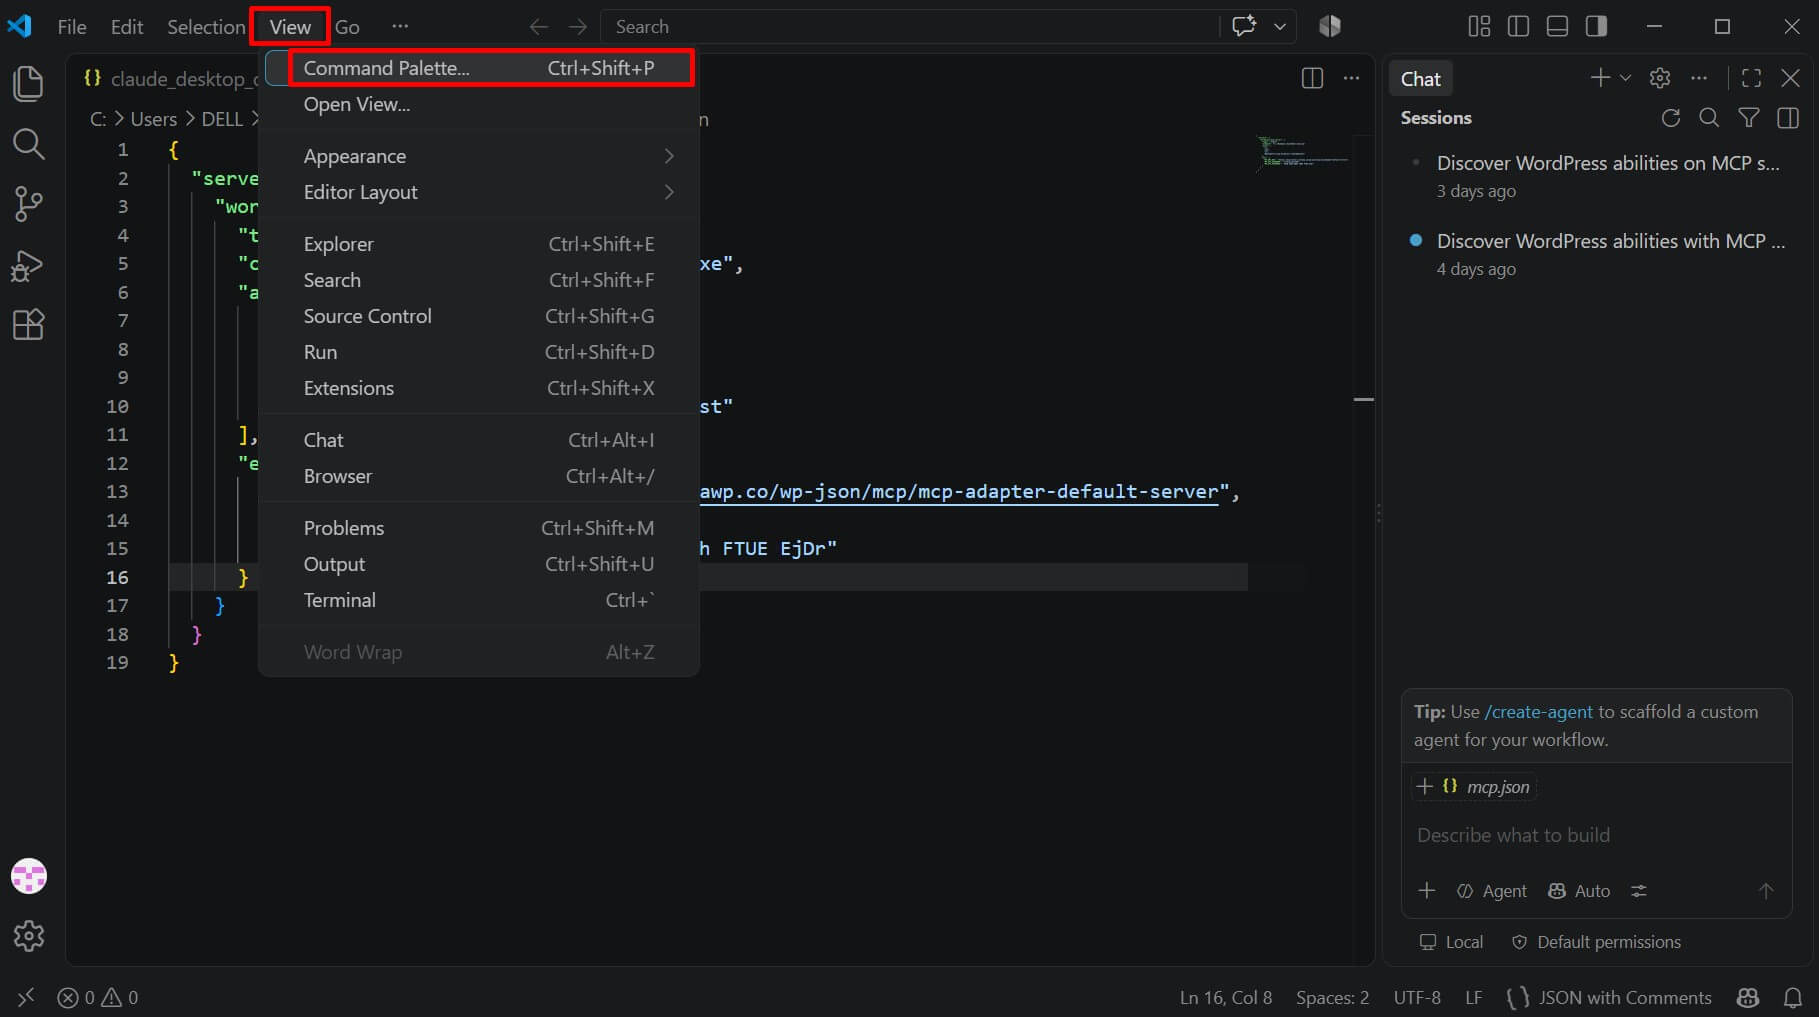
- Go to View > Command Palette, and search for: MCP: Open User Configuration.

- Open the mcp.json file. Add the following MCP configuration:
{

  "servers": {

    "wordpress-mcp-server": {

      "type": "stdio",

      "command": "C:\\Windows\\System32\\cmd.exe",

      "args": [

        "/c",

        "npx",

        "-y",

        "@automattic/mcp-wordpress-remote@latest"

      ],

      "env": {

        "WP_API_URL": "https://YOUR-WEBSITE.com/wp-json/mcp/mcp-adapter-default-server",

        "WP_API_USERNAME": "YOUR_WORDPRESS_USERNAME",

        "WP_API_PASSWORD": "YOUR_APPLICATION_PASSWORD"

      }

    }

  }

}- Replace the placeholder values with your own details:
- WordPress Website URL: Enter your website URL.
- WordPress Username: Enter your actual WordPress username, not the name you gave to the Application Password.
- Application Password: Enter the password generated in Step 2.
- Save the mcp.json file.
The connection path between your AI Agent and WordPress is now ready.
Step 5: Check That AI Can Discover the Abilities
Before asking AI to make any changes to your website, first test the connection.
- Open VS Code and navigate to View > Chat. Switch to Agent mode and ask: Use my WordPress MCP server to discover the available WordPress Abilities. Do not make any changes.
- The AI should be able to discover the available Abilities, including:
- Create Blog Draft
- Publish Blog Post
If these Abilities are available, the connection is working correctly.
Step 6: Ask AI to Create a WordPress Draft
- Now give the AI Agent a real instruction.
- For example: Create a WordPress blog post titled “5 Ways AI Can Help WordPress Site Owners.” Write a short introduction, useful sections with headings, and a conclusion. Save it as a draft only. Do not publish it.
The AI will generate the article and use the Create Blog Draft Ability to send it directly to WordPress.
- Next, go to the Posts section in your WordPress Dashboard. You should find the AI-generated article saved there as a Draft.
Step 7: Review and Publish the Post
- Open the draft in WordPress and review the content carefully.
- Once you are satisfied with the article, return to the same AI Agent conversation and ask: Publish the WordPress draft you just created. Do not change its title or content.
- The AI can now use the second custom Ability: Publish Blog Post.
- WordPress will publish the draft, completing the AI-powered publishing workflow.
Explore More AI and MCP Options for WordPress
In this article, we have created two custom Abilities because our goal was simple: create a blog draft and publish it.
But you don’t always have to build every AI action yourself. There are already WordPress plugins that provide AI features, ready-made MCP tools, or additional integrations for managing different parts of a WordPress website.
- WordPress AI Plugin: The AI plugin for WordPress brings AI-powered features directly into the WordPress dashboard and Gutenberg editor. It can help with content generation and rewriting, meta descriptions, image alt text, and more by connecting AI providers such as OpenAI, Google Gemini, and Anthropic Claude.
- Easy MCP AI: Easy MCP AI is a free WordPress MCP server that connects your website with MCP-compatible AI assistants and agents. It allows AI to handle WordPress tasks such as content creation and publishing, SEO research, traffic monitoring, and daily site management, without any Node.js, external proxy, or complicated setup. Just install the plugin, generate a token, and connect your WordPress site to an AI client.
- WPVibe: WPVibe is a Model Context Protocol (MCP) server for WordPress that connects your self-hosted website with MCP-compatible AI assistants and agents such as Claude, ChatGPT, Cursor, Windsurf, and OpenCode. It lets you give instructions to your AI and have them carried out directly on your live WordPress site, eliminating the need to copy and paste content or switch between your AI chat and WordPress admin.