
Does your website use Elementor Forms and send every submission to the same email address?
If yes, you’re at the right place. The same thing was happening with us.
All form submissions used to be stored in one mailbox. Whenever we checked the inbox, we found 20+ form submissions all mixed together.
Some were sales inquiries, some were technical issues, and some were general questions.
Opening each one and forwarding it to the right person was not only difficult but also annoying. And honestly, half of the day was spent on that.
By default, Elementor Forms sends all submissions to the same email address unless you manually create separate forms.
So, we needed a way that can automatically send emails to different people based on what the user selected in the form.
And after trying multiple ways and finding limitations in the default Elementor form, our team developed the solution: Cool Formkit.
What is Cool FormKit?
Cool FormKit is an advanced plugin designed to extend the functionality of Elementor Forms. It provides you with the option to send custom emails based on input selections using smart conditional logic in Elementor Form.
For example, if a user selects “Support,” the email goes to your support team. If they select “Sales,” it goes to the sales department.
Conditional email ensures the right message reaches the right person, improving response time and user experience.
Now that you understand how Cool FormKit solves this problem, let’s see how to set up conditional email in our Elementor forms.
Step-by-Step Guide to Send Email Conditionally
- You require either of the following two plugins to activate Cool FormKit. Ensure that you have installed and activated them.
- After activating plugins, make sure you have “Turned on“ the conditional email after submit field feature in the WordPress Admin Panel >> Elementor >> Cool FormKit >> Form Elements Tab.
- Now, edit your Elementor form.
Enable Conditional Logic
- Navigate to the Action after submit section below the Form Fields.
- Select “Email Conditionally” from the list. A new panel called Email Conditionally will appear.
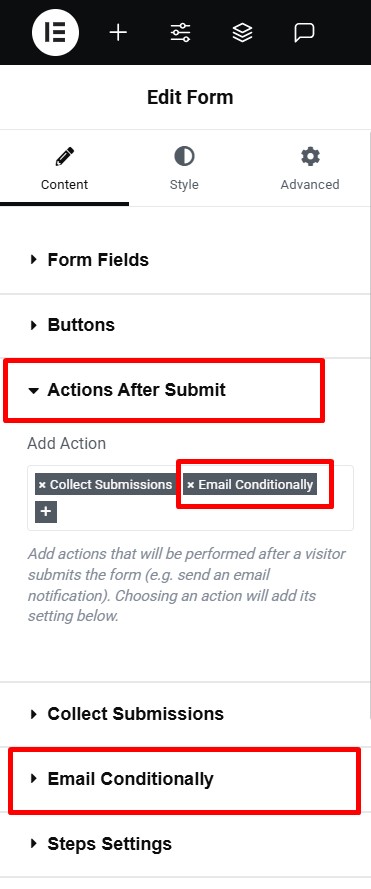
- Toggle ON the Enable Conditions switch.
Set Email Conditions.
Once the conditions are enabled, follow these steps:
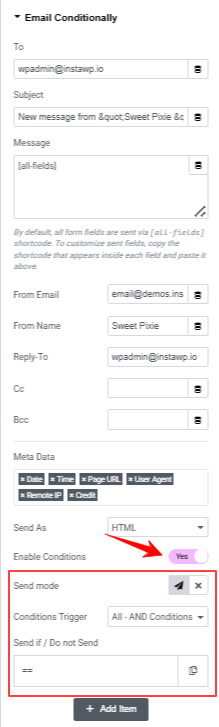
- Use the Send Mode icons to decide what happens when a condition is met:
- Send: Email will be triggered when the condition matches.
- Do Not Send: Email will not trigger when the condition matches.
- Under Condition Trigger, you can combine multiple conditions using:
- AND Logic: All conditions must be true
- OR Logic: At least one condition must be true
- Enter the Field ID of the form field that will trigger the condition.
- Choose a comparison operator (e.g., Equals, Not Equals, Contains, etc.)
- After being satisfied with all the changes, publish your page and preview it.
Add Any Number of Conditional Emails.
You can add multiple conditional emails to your form by selecting “Email Conditionally 1,” “Email Conditionally 2,” and so on from the Actions After Submit list. To increase the number of available conditional email actions, follow these simple steps:
- Go to your WordPress dashboard.
- Navigate to Elementor > Cool FormKit.
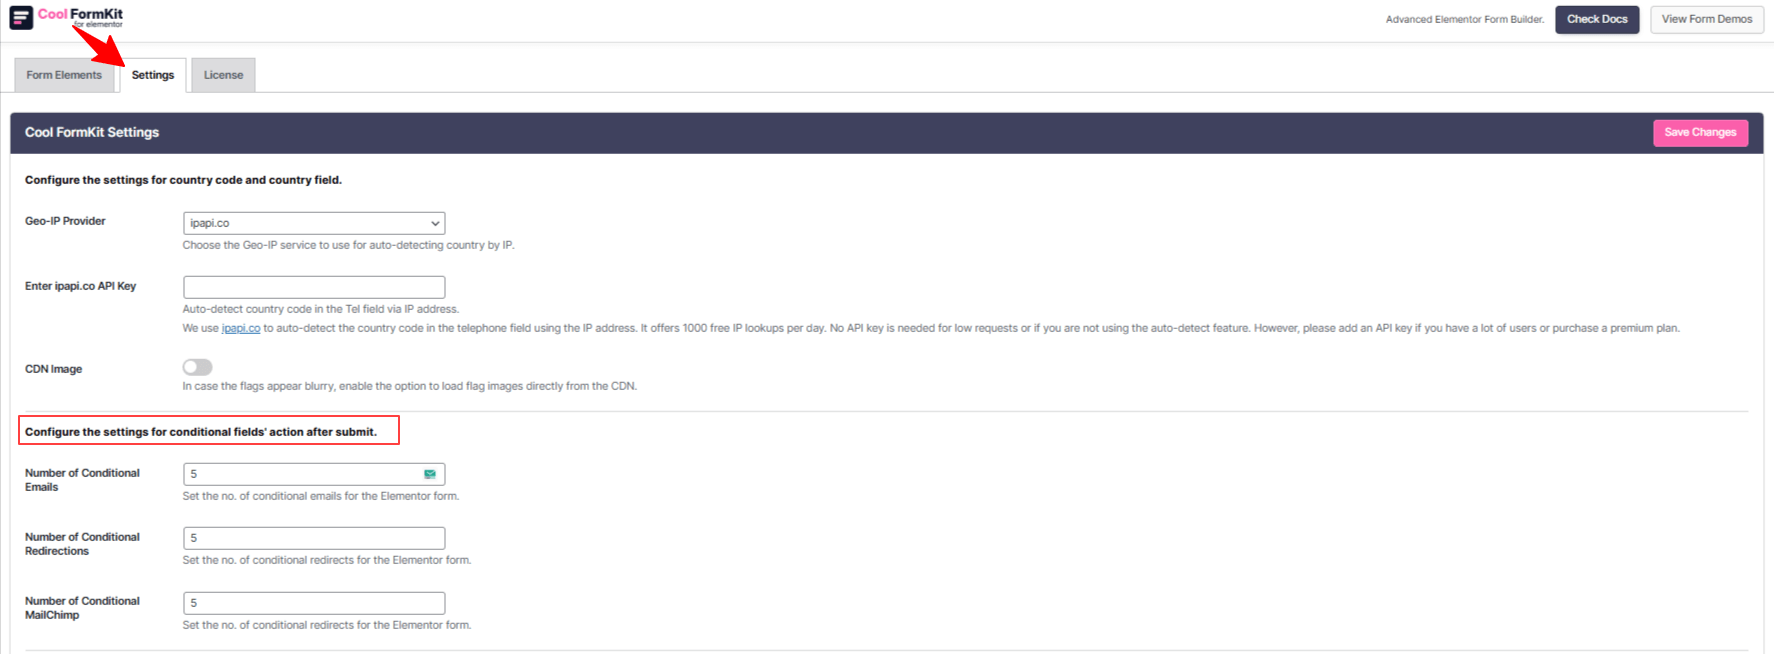
- Under the settings panel, you’ll see the section labeled: Configure the settings for conditional fields’ action after submit.
- In the field labeled “Number of Conditional Emails”, define how many conditional email actions you want to configure for your forms.
- Once you’ve added your desired numbers, save the Changes.
So, save your time and improve your workflow, response speed, and overall user experience with Cool FormKit, instead of managing emails manually.
Additionally, Cool FormKit doesn’t just solve the conditional email limitation of Elementor Forms. It also adds a rating field, a calculator field, country code field, and 20+ more powerful features that are not supported by default Elementor forms.
Read more…
- Create an Interest or Loan Calculator in Elementor using Cool FormKit
- Adding a Range Slider to Elementor Forms using Cool FormKit
- Add Signature Field in Elementor Form using Cool FormKit
- Add country code in telephone field in Elementor using Cool FormKit
- Add a Rating Field to Elementor Form Widget using Cool FormKit