As the title suggests, in this article we will create Custom Validation Rules for WooCommerce Form.
It is easy to make your own custom validation rules in Woo Commerce using action/hooks. We can add the action/hook function and apply the custom validation condition with some rules.
Function used:
- preg_match()
- is_numeric()
- filter_var()
Adding Custom Validation Rules to Woo Commerce Checkout form
Let’s add some of our own validation rules to some fields of the checkout page with the help of an example.
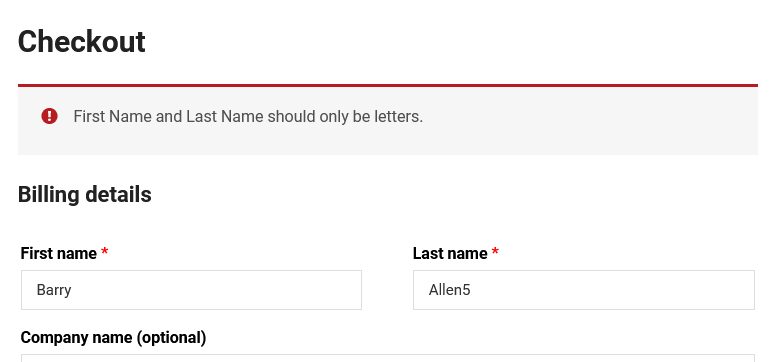
Example 1 : Apply custom validation on First and Last name
In this example we are going to demonstrate our own custom validation rules on the first and the last name field of the woocommerce form.
We can use the woocommerce_after_checkout_validation hook to add the custom function for validation. The condition here is when this field contains any number instead of alphabets it shows an error message.
Look at the code below:
add_action( 'woocommerce_after_checkout_validation', 'cp_validate_fname_lname', 10, 2);

function cp_validate_fname_lname( $fields, $errors ){

if ( !ctype_alpha($fields[ 'billing_first_name' ]) || !ctype_alpha($fields[ 'billing_last_name' ])  ){
        $errors->add( 'validation', 'First Name and Last Name should only be letters.' );
}
}
The above code will check for the presence of any number in the field, and the ctype_alpha() function will check the field for only string letters. If any of the conditions holds false results it will show an error.
Look at the below image for a better understanding.
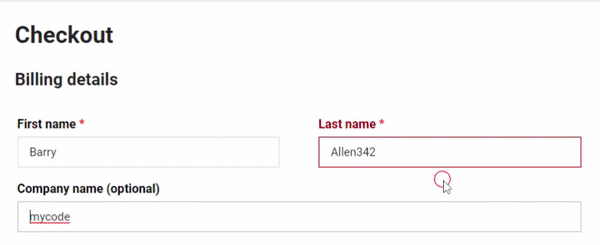
- First of all add the below code to your functions.php file.
- With this code the WooCommerce-invalid class will be added to parent wrapper (.form-row class) of input field.
- This Class will change the highlighted color to red if fields have any errors in it.
Example Code:
add_action( 'wp_footer', 'cp_javascript_validation' );
function cp_javascript_validation(){
if( !is_checkout() )
return;
?>
<script>
jQuery(function($){
    $('body').on('blur change', '#billing_first_name', function(){
        var formRow = $(this).parents('.form-row');
        if( /\d/.test( $(this).val() ) ) {
            formRow.addClass('woocommerce-invalid');
        } else {
            formRow.addClass('woocommerce-validated');
        }
    });
    $('body').on('blur change', '#billing_last_name', function(){
        var formRow = $(this).parents('.form-row');
        if( /\d/.test( $(this).val() ) ) {
            formRow.addClass('woocommerce-invalid');
        } else {
            formRow.addClass('woocommerce-validated');
        }
    });
});
</script>
<?php
}It will check if the field passes the validation or not, if error occurs, then the input field will get highlighted with red color.
See the below image for better understanding.
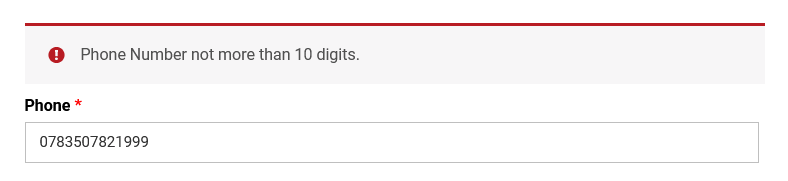
Example 3: Applying Custom Rules on Phone Number Field
We need to validate if the phone number has more or less than required digits. If there is an invalid number of digits it will show an error. Add your own rules according to your requirements.
Example Code:
add_action( 'woocommerce_after_checkout_validation', 'cp_validate_phone', 10, 2);
function cp_validate_phone( $fields, $errors ){
if(!preg_match('/^[0-9]{10}+$/', $fields[ 'billing_phone' ]))
$errors->add( 'validation', 'Phone Number not more than 10 digits.' );
}
}
Example 4: Custom Rules on Website URL field
If you have a custom field in woocommerce you can easily validate it for anything, here we are validating the URL.
We can easily validate this by using the use_filter_var() PHP function.
Syntax:
filter_var()Parameters:
- $url
- FILTER_VALIDATE_URL
Example Code:
add_action( 'woocommerce_after_checkout_validation', 'cp_validate_url', 10, 2);
function cp_validate_url( $fields, $errors ){
if ( filter_var( $fields[ 'billing_url' ], FILTER_VALIDATE_URL ) == false ) {
    $errors->add( 'validation', 'Please provide valid URL.' );
}
}After applying the validation rules if you have entered a wrong URL, there will be an error as shown in the image below.
Example 5: How to remove Default validation rules
To remove the default checkout field validation rules hit the filter hook function. Use the woocommerce_checkout_fields hook to remove it.
Example code:
add_filter( 'woocommerce_checkout_fields', 'ybc_remove_default_validation' );
function ybc_remove_default_validation( $fields ){

unset( $fields['billing']['billing_postcode']['validate'] );
    unset( $fields['billing']['billing_email']['validate'] );
return $fields;
}This is the way by which you can remove the default validation rules, here we have removed the default rules for the billing fields Postcode and Email.