The Events Calendar Pro is a popular WordPress plugin for managing events on a website. You can use it to add events, venues, organizers, categories, recurring events, and more.
Events websites contain many events like past events, upcoming events and current events.
As time passes, more events are added into the “past events” category and remain stored on your website.
While keeping the old events can be useful for record-keeping, displaying them to visitors is not always the best option. This can confuse visitors because they might think those events are still active and it can also make your event pages look outdated and irrelevant.
But, when there are no upcoming events available, The Events Calendar automatically displays recent past events in the main event listing.
However, The Events Calendar plugin provides several ways to manage past events and keep your event listings updated or relevant.
In this guide, we’ll walk you through three different methods to hide past events in The Events Calendar.
But before we go through each method, let’s first understand how these methods work and when you should use them.
The Events Calendar offers two options to manage past events. Understanding the difference will help you choose the right method for your website.
Hide or Trash: Manage Past Events in The Events Calendar
The Events Calendar provides two ways to manage past events. Although both options remove old events from public event listings, they work differently.
- Hide Events: When you hide past events, visitors can no longer see them on your website. However, the event data remains available in your WordPress dashboard. This option is useful if you want to keep a record of old events and may need them again in the future.
- Move Events into Trash: When you move past events to the Trash, they are removed from your event listings and placed in the WordPress Trash section. Visitors can no longer view them on the website. If needed, administrators can still restore the events from the Trash.
Now that we have understood the difference between hiding and trashing past events, let’s discuss the three methods to manage past events in The Events Calendar.
Methods to Hide Past Events in The Events Calendar
Depending on whether you want to hide past events or automatically move them to the Trash, you can choose one of the following methods.
Method 1: The Events Calendar “Tweaks” Extension
If you want to hide past events from visitors without removing them from your website, the Tweaks Extension is the best option.
It prevents old events from appearing in public event listings while keeping all event data available in your WordPress dashboard.
This means you can still view, edit, or reuse past events whenever needed.
Follow the steps below to hide past events using tweaks extension:
- First, make sure that you have installed and activated the Tweaks extension (The extension is available in the official The Events Calendar Extensions library).
- Now, from your WordPress dashboard, navigate to Events > Settings > Tweaks.
- Here, choose any one option to manage past events:
- Disable Recent Past Events: Enable this option to stop The Events Calendar from automatically showing past events when there are no upcoming events available.
- Hide Past Events in Month View: Enable this option to hide events that have already passed from the current month’s calendar view.
For example, if today’s date is June 20, events that occurred between June 1 and June 19 will not appear in the month view. The events are only hidden from visitors and remain available in your WordPress dashboard.
This method is ideal if you want to keep your event history while preventing visitors from seeing outdated events.
Method 2: Remove Past Events Extension
The Remove Past Events Extension helps you keep your event calendar clean by automatically moving old events to the trash.
It offers multiple custom time frame options, such as 15 minutes, 1 hour, 1 day, or 1 week after an event ends. This gives you better control over desired time frames, allowing you to manage past events the way that works best for your website.
Follow the steps below to hide past events using Remove past events extension:
- Install and activate the Remove Past Events extension (The extension is available in the official The Events Calendar Extensions library).
- Navigate to Events > Settings > General.
- Next, scroll down to the Maintenance section.
- Locate the “Move to trash events older than” setting.
- Select the desired time frame for removing past events. The extension adds more custom options such as 15 minutes, 1 hour, 1 day, 1 week, etc.
- After done, Click Save Changes.
Once configured, past events will be automatically moved to the WordPress Trash based on the selected time frame.
This method is useful when you regularly create events and want old events removed automatically.
Method 3: Built-in Maintenance System
If you prefer not to install additional extensions, you can use The Events Calendar’s built-in Maintenance feature.
This feature automatically moves old events to the WordPress Trash after a selected period. Available options include 1 month, 3 months, 6 months and so on.
Follow these steps to enable it:
- Log into your WordPress dashboard.
- Go to Events > Settings > General tab > Maintenance Section.
- Find the option “Move to trash events older than” and select a time frame. By default the minimum time frame is one month.
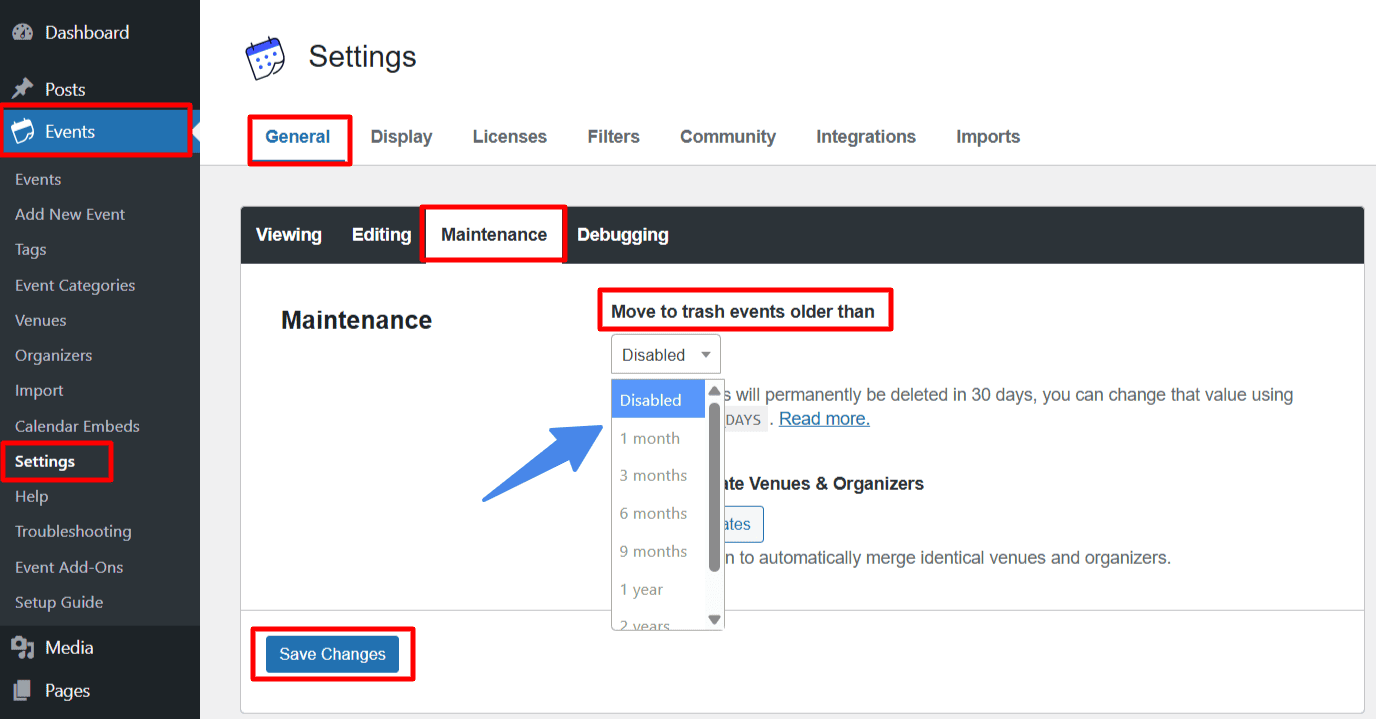
- Click Save Changes.
After saving the settings, events older than the selected period will be automatically moved to the Trash.
This method is best for users who want a simple built-in solution and do not need shorter cleanup intervals.
Conclusion
The best method for managing past events depends on how you want to handle your event data.
- Tweaks Extension is ideal if you want to hide past events from visitors while keeping them available in your WordPress dashboard.
- Remove Past Events Extension is a good choice if you want to automatically move old events to the Trash using flexible time periods such as 15 minutes, 1 hour, 1 day, or 1 week.
- Built-in Maintenance Feature works well if you prefer not to install an additional extension and are comfortable with longer cleanup periods.
By choosing the method that best fits your needs, you can keep your event listings organized, reduce visitor confusion, and ensure your website displays relevant event information.