Spam submissions in Elementor forms are one of the most frustrating issues you’ll face as a website owner. Whether you’re collecting contact messages, lead information, or user feedback, unwanted bot submissions clutter your inbox, increase storage and server load, and make true leads hard to find.
But, now you can stop these spam submissions in Elementor forms. In this guide, we’ll walk through why it happens and how you can block it using human-friendly verification tools.
Why Do Elementor Forms Get Spam?
Spam usually comes from bots, not real people. These bots scan websites looking for forms. When they find one, they automatically submit it with fake data. By default, Elementor forms do not include strong bot detection. This means automated scripts (bots) can scan your site and submit fake entries.
To prevent this, it’s important to add verification that ensures a human, not a bot, is sending the form.
Common Ways to Stop Spam in Elementor Forms
There are several methods to reduce spam, such as honeypot fields, blocking IP addresses, and manual moderation. But these methods are not always reliable and can still let bots pass through.
The most effective solution is to use human verification tools like hCaptcha and Cloudflare Turnstile. Wondering how to add them? Well, Cool FormKit is the solution.

Cool FormKit is a powerful addon that extends Elementor forms and helps you control form behavior easily. One of its most useful features is spam protection using hCaptcha and Cloudflare Turnstile.
What is hCaptcha?
hCAPTCHA is a privacy CAPTCHA solution that helps websites verify human users and block automated bots. Unlike traditional CAPTCHA systems, hCAPTCHA is lightweight, secure, and focuses on protecting user privacy while offering an easy verification challenge, like a simple image challenge (selecting umbrellas), ensuring the submission is from a real human and not an automated script.
Steps to add hCaptcha to Elementor Forms
- Firstly, make sure you have “Turned on“ the hCAPTCHA feature in the WordPress Admin Panel >> Elementor >> Cool FormKit >> Form Elements Tab.
- Next, you have to set up API Keys.
(The Site Key and Secret Key are essential credentials that link your website to hCAPTCHA’s verification system. You can easily generate them from hCAPTCHA)

- Once you’ve generated the keys, paste them into the WordPress Admin Panel by navigating to Elementor >> Cool FormKit >> Settings >>hCAPTCHA Settings.
- Edit your form with Elementor.
- Navigate to the Content section of your Form Field. From the Field Type dropdown, select hCAPTCHA.
- Once you’ve implemented hCAPTCHA, you can customize it using the following options:
- Size: Select the size of the hCAPTCHA widget from Normal or Compact.
- Style: Choose the widget style from Light or Dark theme according to your website’s design.
- Disable Submit Button: Prevent unverified form submissions by disabling the submit button until CAPTCHA is completed.
- Custom Message: Set a personalized error or guidance message for CAPTCHA.

That’s it, hCaptcha will be integrated to your Elementor forms.
What is Cloudflare Turnstile?
Cloudflare Turnstile is a privacy-first CAPTCHA alternative that verifies whether a user is human without annoying challenges like selecting traffic lights or crosswalks. Instead of showing a CAPTCHA puzzle, Turnstile silently verifies user behavior in the background and allows genuine users to proceed. It provides a smooth and secure form experience while protecting your site from spam and abuse.
Steps to add Cloudflare Turnstile to Elementor Forms
Follow these simple steps to add a Cloudflare Turnstile to Elementor forms:
- Firstly, make sure you have “Turned on“ the Cloudflare Turnstile feature in the WordPress Admin Panel >> Elementor >> Cool FormKit >> Form Elements Tab.
- To make Cloudflare Turnstile work with your Elementor form, you must connect your website to Cloudflare’s verification system. This is done using two keys: Site Key and Secret Key. You can generate them from Cloudflare Turnstile.

- Once you’ve generated the keys, paste them into the WordPress Admin Panel by navigating to Elementor >> Cool FormKit >> Settings >> Cloudflare Turnstile Settings.
- Next, edit your form with Elementor.
- Navigate to the Content section of your Form Field. From the Field Type dropdown, select Cloudflare Turnstile.
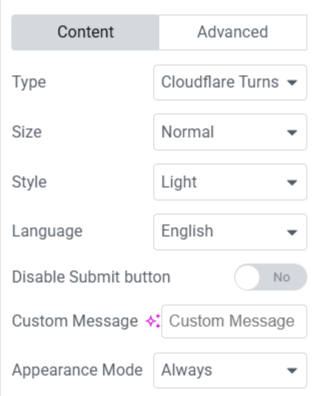
- Once you’ve implemented Cloudflare Turnstile, you can customize it using the following options:
- Size: Select the size of the widget from Normal or Compact.
- Style: Choose the visual theme: Light or Dark to match your form’s design.
- Language: Select the Cloudflare Turnstile language (e.g., English, Spanish, French).
- Disable Submit Button: Enable/disable the form’s submit button until Turnstile verification is complete.
- Custom Message: Set a personalized error or guidance message for Cloudflare Turnstile.
- Appearance Mode: Control the display of the Turnstile widget.
That’s it, Cloudflare Turnstile will be integrated to your Elementor forms.
Which One Should You Choose?
Both options are powerful, but the choice depends on your needs. If you want strong bot detection with visible verification, choose hCaptcha, or if you want invisible protection with the best user experience, choose Cloudflare Turnstile.
The good part is you’re not locked into one option. Cool FormKit lets you switch easily between hCaptcha and Cloudflare Turnstile.